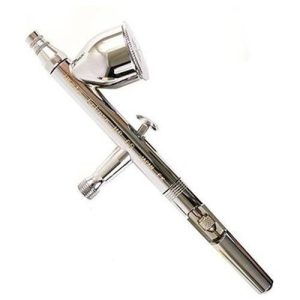
Best Airbrush for Beginners [Airbrush Buying Guide 2025]

Are you looking to invest into an Airbrush and wonder what is the best airbrush kit around? Not sure where to start? You are starting your journey in airbrushing and wondering what is the best airbrush for beginners? Whether you are looking for the best modelling airbrush, the easiest airbrush to clean, or simply just a good airbrush to start with, then you came to the right place. If you are rather looking for an airbrush kit (airbrush + compressor), then refer to my post about best airbrush kits.
In this airbrush buying guide, I will try to cover everything you need to know before taking that step to buy your first airbrush.
The airbrush is a fantastic tool can be used in numerous different arts: going from model making or fashion design, to cake decorating, illustration or even make up.
In this Airbrush buying guide, I will try to answer the following questions for you:
What is the best Airbrush for beginners?
What to look for when buying an airbrush?
Do you want to start airbrushing and you ask yourself what is the best airbrush to start with? For someone starting his or her journey in airbrushing, I would always recommend the following:
Are cheap airbrushes worth it?
I want to answer that question as early as possible because I know most beginners are tempted at the idea of getting a cheap airbrush. You can find a lot of different airbrushes on the market, from the very cheap Chinese build airbrush costing only $20, to the great quality built airbrush costing several hundred dollars.
As a beginner, I wouldn’t recommend any of those cheap airbrushes. This is my own point of view and some people would disagree. You can expect the manufacturing quality of those cheap Chinese airbrushes to be very poor at that price. They will clog, leak, have bad trigger action and they will seriously lack of precision.
The risk is also that those cheap airbrushes will put you off all together from airbrushing. You might spend more time cleaning your airbrush than you would spraying.
In my opinion, I would would consider them as a waste of money. You are probably going to invest in a good airbrush at one stage anyway, so why not do it at the start? You will end up saving money! If you can’t afford it right now, just wait and save. Don’t worry, they are some solid build airbrushes under $80, they won’t break the bank.
In the other hand, for beginners, I wouldn’t recommend either a top of the range airbrush either because they have features that wouldn’t be necessary for you at that stage.
Best Airbrush for Beginners
Below are a list of the great quality airbrush ideal for beginners but also for experienced airbrush artists.


The NEO range of airbrushes for IWATA are design for beginners on a budget. Like every other IWATA airbrush, it comes with a 5 Year Limited Warranty. It is a very well priced airbrush made with high quality material. It is a very versatile airbrush . Check also the IWATA airbrush comparison chart if you want more info on the full range of NEO airbrushes.

This IWATA Revolution airbrush is a step higher in quality and precision from the NEO range. The Revolution range is is also a very affordable serie of Iwata airbrushes with a simple and elegant design perfect for new starter but also more experience airbrush artists. If you are a beginner in airbrushing looking for a great quality airbrush under 100$, you have found the perfect airbrush! Remember to have a look at my IWATA airbrush comparison chart: you will see all the IWATA airbrushes, will link to their spare parts list and the application their are best suited for.

The IWATA Eclipse HP CS is a multi-purpose high quality airbrush that really will last you a lifetime. If you are into models building, this is certainly one of the best beginner airbrush for models.
Really a great airbrush for beginners. See the full review of the IWATA Eclipse.

The Badger Patriot is also a good priced high quality airbrush airbrush. Its really one of my favorite airbrush kit. It has an “Easy Access” needle removal system that make it easy to clean and disassemble. The Patriot is the ideal airbrush for beginners but it will also suit more advanced users. Also a very versatile airbrush, that will suit projects with high coverage but also more work on fine details. See the full Badger Patriot Review.

The Paasche TG is a double action gravity feed airbrush made and assembled entirely in the US. The airbrush features a chrome plated body and anodized aluminum handle for durability.(see my full review of the Paasche Talon airbrush)
The Paasche Talon is a fantastic detail airbrush that will allow you to achieve hair line detail.It comes with the optional fan head, which has two little air holes in the pins that stick up, and these cause the spray to come out in a fan pattern up to 3 inch wide.
A PTFE packing allows the TG to handle any water or solvent based paint. The Paasche TG Talon is very easy to assemble and disassemble for cleaning. Clean up is as simple as spraying your paint cleaner though the airbrush and wiping of the needle. The Paasche Talon is a real quality built airbrush, with nice and smooth trigger action that I will highly recommend. You won’t be disappointed. Guaranteed.
See the Full Paasche Talon Airbrush Review

The German made Harder & Steenbeck Ultra X has a 0.40mm nozzle and needle as opposed to the Harder & Steenbeck Ultra that has a finer 0.20mm nozzle and needle. They both can be considered ideal airbrush for beginning airbrushers. Very easy to maintain, and again very versatile airbrush that will allow you spray most model projects.
Best Airbrush kits
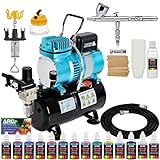
An airbrush kit that includes both an airbrush and a compressor is a comprehensive package designed for users to start airbrushing right out of the box. The airbrush is a precision tool that sprays paint, ink, dye, or makeup in a fine mist, allowing for detailed and smooth application. The compressor is the device that provides the airbrush with a continuous, controlled stream of air, necessary for its operation. These kits often also include additional accessories such as hoses, connectors, and sometimes different types of needles and nozzles for various spray patterns and detail levels.
Check out my post about the Best airbrush kits.
Buying an airbrush kit with both the airbrush and compressor together can offer several advantages:
- Compatibility: Purchasing a kit ensures that the airbrush and compressor are compatible with each other, which can save the hassle of researching and matching specifications like air pressure requirements and hose connections.
- Cost-Effective: Kits are often more economical than buying each component separately. Manufacturers may offer a bundle discount, making it a cost-effective option for beginners and professionals alike.
- Convenience: Getting both main components in one purchase means you can start your projects immediately without the need to shop for additional parts. It’s especially convenient for beginners who might not be familiar with the specifics of airbrush equipment.
- Quality Assurance: When bought as a set, both the airbrush and compressor are likely to have been tested together by the manufacturer, ensuring good performance and reducing the risk of incompatibility issues.
- Learning Resources: Kits sometimes come with instructional materials or DVDs, which can be very helpful for beginners learning how to use and maintain their new equipment.
- Portability: Many kits are designed with portability in mind, with compact compressors and carrying cases, making it easier to transport your airbrushing setup to different locations or store it when not in use.
Overall, purchasing an airbrush kit that includes both the airbrush and compressor can be a smart move for those new to airbrushing, as it provides a one-stop solution with optimized components that work well together, offering a smoother entry into airbrushing with less initial setup and research required.


What are the different type of airbrush?
They are different types of airbrushes available out there, and each of them would have different characteristics that would suit one or several applications better, but all airbrushes basically obey to the same basic principle:
A flow of compressed air is fed through the tool (airbrush) and will draw the medium (paint, ink of whatever fluid you are using) from its reservoir and atomizes it into very tiny droplets. The moving air is at a lower pressure than static air creating “suction” for the medium (paint).
In this airbrush buying guide, we will to understand the different type of airbrush available and how they operate:
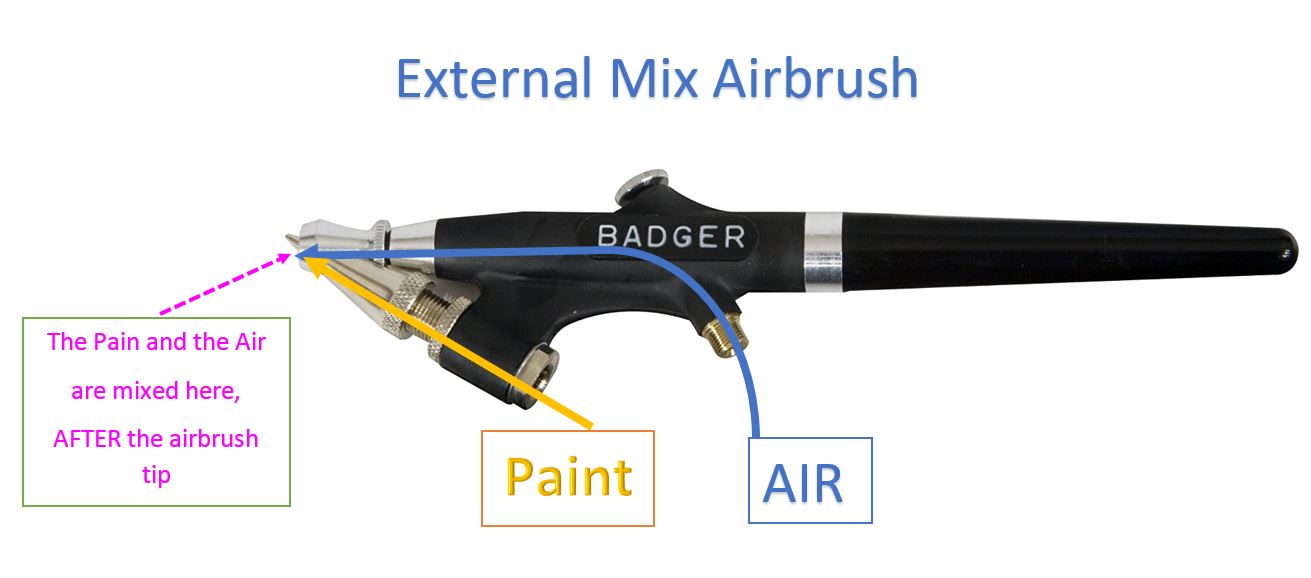
Internal vs External Mix Airbrush
The difference refers to the way the paint mixes with the air to become atomized.
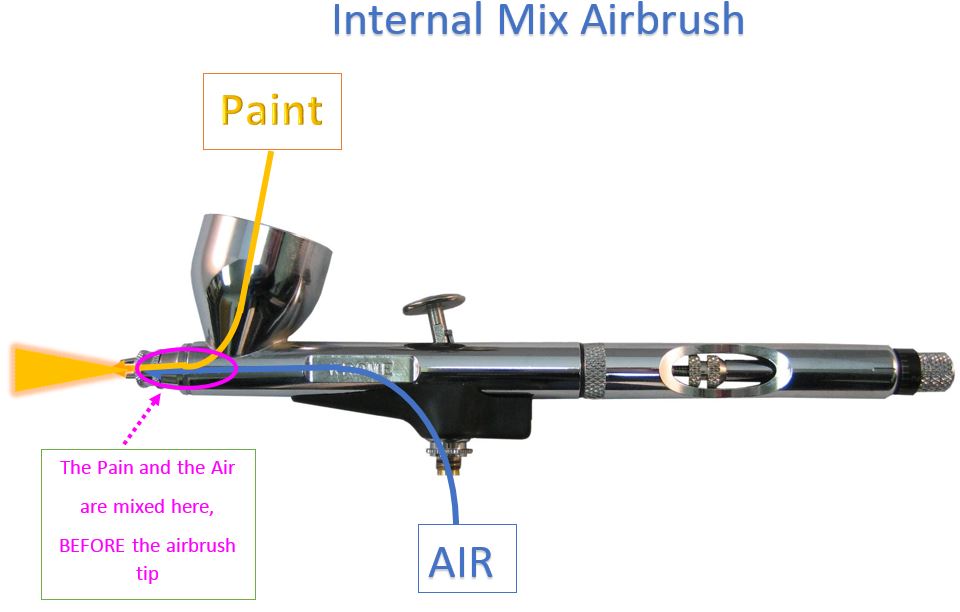
External Mix airbrush is your ideal airbrush if you need to spay a large area without being too concerned about the details.
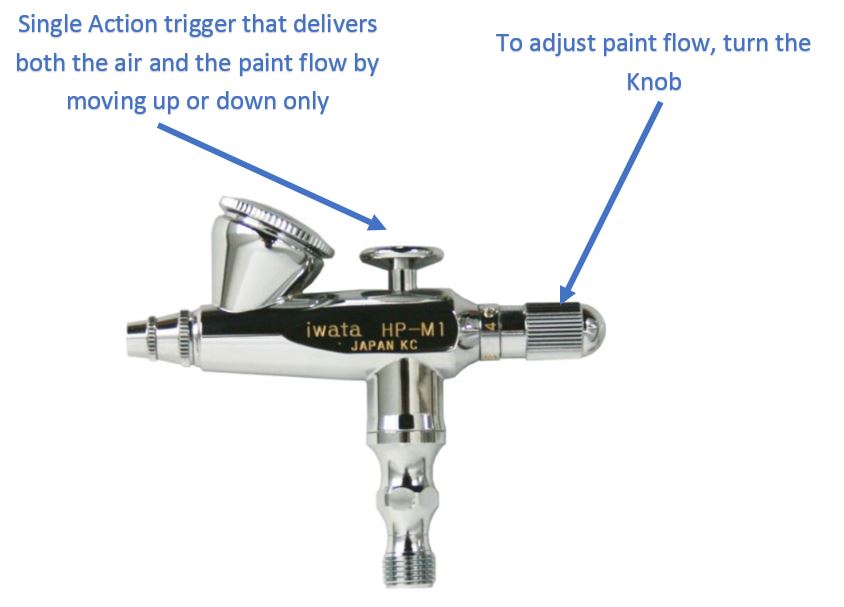
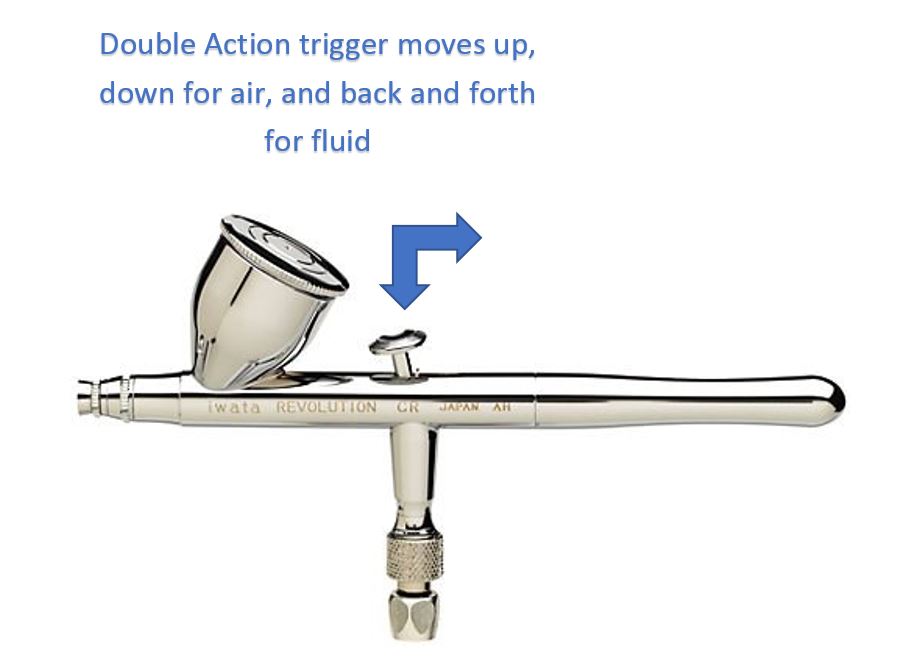
Single action vs Double Action Airbrush:
Single action vs double action airbrush, this is a question most beginners would ask themselves.Here I will try to answer that question for you. Hopefully this will help you make your choice between a single action airbrush and a double action airbrush.
They are call single airbrush because by pressing the trigger, it delivers both the air and the paint flow without any possible adjustment. You can modify the paint flow separately by turning a screw or knob located at the rear of the airbrush that will adjust the needle position in the nozzle.
Pro & cons of a Single Action Airbrush
See the best selling Single Airbrushes on Amazon
Double action airbrushes are probably the most widely used airbrushes out there. They are more precise airbrush, ideal for art painting for instance. They allow much more control and are much more precise than the single action airbrushes. The airflow is controlled by pressing the airbrush trigger and the paint flow is controlled by pulling the same trigger back. The more you pull the trigger back, the bigger the paint flow is, making the spray pattern wider.
Pro & cons of a Double Action Airbrush
See the best selling Double action Airbrushes on Amazon
Gravity feed vs siphon Feed airbrush?
You can recognize those type of airbrushed with their bottle or container located generally at the bottom or on the side of the airbrush. As the air is going through the airbrush, the paint is pulled up by a vacuum into the airbrush towards the nozzle to be atomized.
The bottle on those airbrushes is larger than gravity feed airbrushes so they be useful if you have to pain larger surface without having to refill the bottle. They are also fitted with larger nozzle than those fitted on gravity feed airbrushes.
Also colour swapping is making easier with siphon feed airbrushes as it is very easy to just interchange bottle of different colour paint. You could potentially have few bottles of different colours ready to be used and also a bottle of cleaner you can use in between colour changes.
All of those above characteristic make the siphon feed airbrushes more suited for users that want to paint large area.
Artists that paint on T-Shirt or work on airbrushed Tattoos, culinary art Painting often use those kind of siphon feed airbrushes.
Pro & cons of a Siphon Feed Airbrush
Gravity feed airbrush are generally used by airbrush users that want to do fine detail work. They draw the paint down from a cup located at the top of the airbrush.
Pro & cons of a Gravity Feed Airbrush
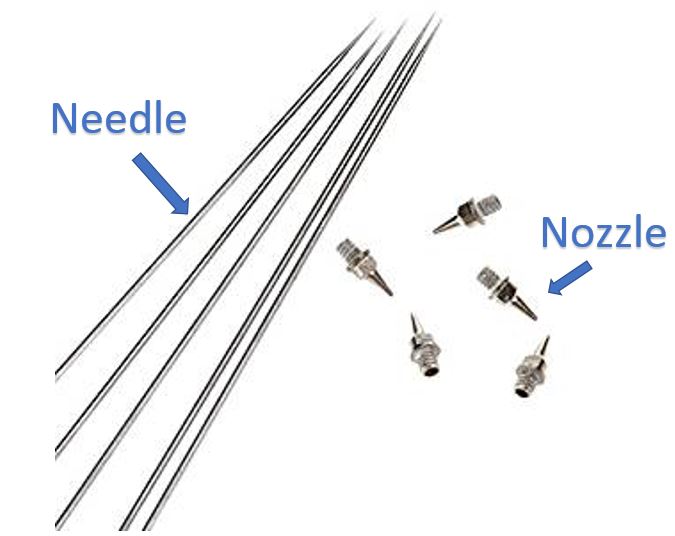
Which nozzle size and what needle to choose for my airbrush?
The nozzles and needles are very fragile. Therefore it is better to a spare one in stock as they can easily be bend or damaged if you drop the airbrush or during the maintenance. Make sure to choose an airbrush for which you can find spare parts. You will definitely have to replace either a nozzles or a needles at some stage. Check out the price for those parts also as you might need to replace them more frequently that you think.
It is easy to get spare parts for Airbrushes manufactured by well known brand like Iwata, Badger, Paasche etc, but you wont be so lucky with cheap Chinese airbrushes. That’s one of the reason I stay clear from them personally.
What size nozzle is best for airbrushing?
I will depends again of what use you are going to have with the airbrush.
So it is hard to answer the above question, the choice of the nozzle\needle assembly will really depends on what you are going to do with it.To make it easier, some airbrush like the Badger SOTAR 20/20 comes with a set of different nozzle\needle.
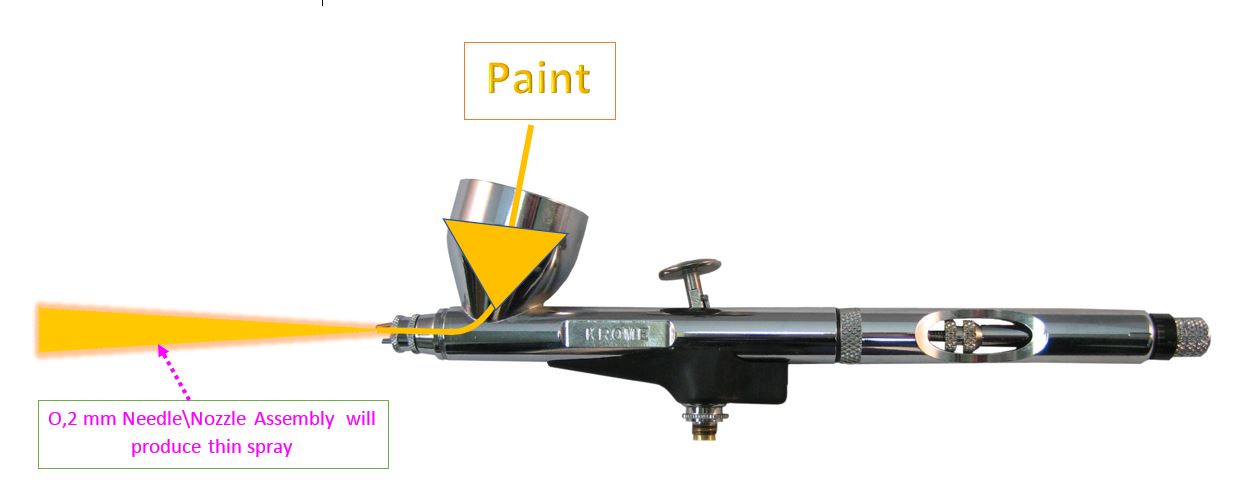
For me, 0.4mm is a good compromise to get started. Starting with a 0.15mm / 0.2mm needle is complicated: the nozzle and needle are very fine and can get clogged easily, and you may spend much more time cleaning the airbrush than painting.
See in this little table how all those elements interact with each others:
| Needle | 0.2 mm | 0.3 mm/0.4 mm | 0.6 mm |
| Pressure PSI | 10 to 20 | 22 to 32 | 22 to 36 |
| ink and Dyes | ink and Dyes | ink and Dyes | |
| Createx | Createx | Createx | |
| Watercolor | Watercolor | Watercolor | |
| Food colorant | Food colorant | Food colorant | |
| Acrylics | Acrylics | ||
| Oils | Oils | ||
| Bio paint | Bio Paint | ||
| Surface to paint | 8 x 8 inch | 20 x 20 inch | 30 x 30 inch |
Advantage and inconvenient, what airbrush for what application?
In the table below, you will be able to see some advantages and inconvenient for the different types of airbrushes I described previously. You can also see which type of airbrushes is suitable for what application
ADVANTAGE | INCONVENIENT | BEST SUITED FOR | |
| GRAVITY FEED | Fine details work Work with lower air pressure Dispense all paint in cup (even metallic paint) Easier to clean Faster response time to get paint out Stop and Start of a line easier Need less pressure (works with smaller compressor) | Smaller cup not suited for painting large area Reload paint cup more often if painting large area Cup can block the view | Illustration, fine art, Make-up artist, Model painting, some cake decorating |
| BOTTOM FEED\ SUCTION FEED | bigger paint jar, suited for painting large area (T-shirt, Tattoo), Easy & quick to change colour Side Bottle can be rotated Allow to paint at any angle (upside down) Allow good visibility, cup not in the way | Not suited for detail work Need more pressure Harder to start& stop lines when working Takes a bit longer to clean | Suited for tee-shirt painting, Tatoo Culinary art Painting |
| DOUBLE ACTION | Allow very fine control Good for fading or blending Versatile airbrush Instant control over the amount of paint and spray pattern. Control both air and fluid actions | A bit more difficult to use for beginner | Illustrating, art, crafts, model painting, Make-up artist, |
| SINGLE ACTION | Ideal for solid fill area Good for beginner\novice | Can’t adjust paint flow with trigger. Less instant control than dual-action airbrushes | Tanning Spray, cake decorating, base or top coating for model painting |
Best Airbrush for Beginners :What airbrush to buy?
I gave you already quite a bit of information in there but if you are still unsure, there is few more thing that you can also consider before making your choice to buy an airbrush.
If you are into fine art paint, Illustrating or want to paint plastic models, you really to have a maximum control over the amount paint and air you spray. Double action airbrushes will suit you better.
Airbrush Nozzle
You can find double action airbrushes with different size on nozzle\needle out there: 0.2 mm, 0.3 mm, 0.4 mm, o.5 mm, 0.6 mm …..I already cover that in the previous paragraph.
If you need to work on large area, you will want to choose an airbrush with a large nozzle (0.5 mm or more). If you need to paint fine details, thin line, then obviously you will require a finer nozzle.
You can have a type of airbrush for a particular type of job. However, you can find some airbrush out there that have an interchangeable nozzle system. That will allow to do several type of jobs with the same airbrush (like the Iwata-Medea Eclipse HP CS). This will give you a lot of flexibility. You could spray background with a set of nozzle and then swap the nozzle\needle\cap for a thinner one do work on the details.
Stop set trigger control:
Another element I wanted to mention is the stop set trigger control. You can find on some dual action airbrush like the Badger Renegade range. It is also called “speed dial” on the Harder and Steenbeck Infinity airbrush for instance.
This will allow you set how far the needle can go back when you pull the trigger, to restrict the amount of paint that can get atomized. Handy when you want to spray even size lines. Although this feature might not be necessarily a must for the pro, it is a nice safety net to have for a beginner.
Airbrush price:
I already cover why I don’t recommend cheap, low quality airbrushes on the first section of this post.But I want to say it again. There are some airbrush manufacturers out there who produce very cheap, low quality airbrushes, with non-existent spare parts. I would stay clear from those airbrushes. They are designed to be used only a few times before they usually fail to function correctly.
So don’t buy a $30 airbrush but try to invest a bit more money if you can. You won’t regret it. You can find a very good airbrush for $150.
The main airbrush manufacturers on the market are :
- Badger – US manufacturer see popular Badger Airbrushes on Amazon
- Paasche – US manufacturer see popular Paasche Airbrushed on Amazon
- Aztek – US manufacturer see popular Aztek Airbrushed on Amazon
- Iwata – Japenese manufacturer see popular Iwata Airbrushes on Amazon
- Harder and Steenbeck – German manufacturer see popular Harder and Steenbeck Airbrushes on Amazon
- Hansa – German manufacturer see popular Hansa Airbrushes on Amazon
Those manufacturer produce reliable, high quality products, with high quality materials. The all have a wide range of spare parts and accessories for their airbrushes. It is very important as you will soon discover!
Simplicity of disassembly / reassembly:
This is also an important factor because at the beginning, you will spends a lot of time cleaning your airbrush.
Check out my post about about how to clean an airbrush. You will discover a detailed step by step guide with photos that will show you how to dismantle your airbrush and clean it properly.
Best airbrush for beginners: Closing comments
There you go, I think I covered everything I wanted to speak about in this airbrush buying guide for beginners. If you are a beginner, I hope this post will help you to choose the right airbrush for you and that you have found this post informative. Hopefully you have a better understanding of the airbrush now than before reading it.
Please leave a comment below and let me know if this post has helped you to choose your first airbrush.
![Best Airbrush for Beginners [Airbrush Buying Guide 2025]](https://airbrushgeek.com/wp-content/uploads/thumbs_dir/Best-Airbrush-Compressor-2-qkvl3h0bgpdps3jj7tp4189pp8xx73q7a2wj17jinw.png)
![Best Airbrush for Beginners [Airbrush Buying Guide 2025]](https://airbrushgeek.com/wp-content/uploads/thumbs_dir/best-airbrush-for-cake-decorating-3-qkvl27w2cnnyatd2ja70pjnl6r4axmr33vl7zxeeyk.png)


